


In this tutorial, we’ll be looking at how to create volumetric lighting in After Effects by looking at how we can practically recreate it or accentuate it here in After Effects.
We’ll be following on form our previous lesson on how to add volumetric lighting and move on to how to use some effects and presets to enhance the look of our shot. To do this we’ll be using a stock video of what appears to be an old church with some eye tracking movement.


You’ve got light streaming in from the window above on the right hand side and then a little bit duct near the top of the stairs. We won’t be looking at the practical lights created by the lamps so we’ll mainly be focusing on the lights that are coming from the windows.


Now we can already see that there is a very feint ray of light coming out through the window, but we want to accentuate it further.


How to Create CC Light Rays
To do this, let’s go to the Effects & Presets panel and search for ‘CC Light Rays’ and the click and drag it directly onto the footage to apply it.
Once applied you will be able to see a small light appear within the scene. This can be moved by dragging it across the composition with the mouse. As you move it, you can see it’s picking up solid parts of the image and generating light rays based on what it’s seeing.


Now place the light on top of the windows and you’ll start to see a really cool effect take place where the light rays appear to be separated by the thin bars of the window. This really helps sell the effect!


From there, you can go to the Effect Controls panel and have a play around with the parameters that control the light. These controls will allow you to adjust things like the intensity and color of the light. In the image below you can see the what we have used for the tutorial.


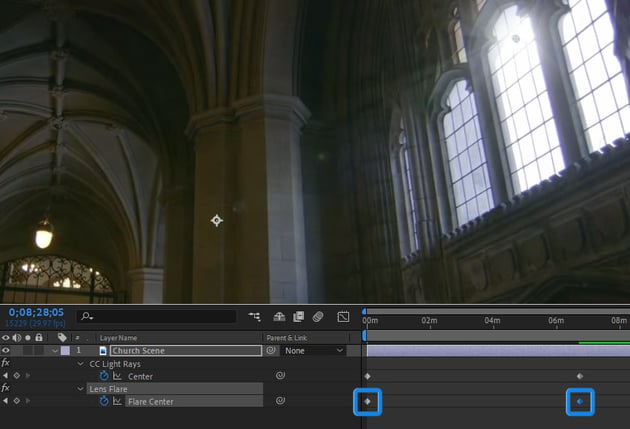
Now that we have our light in the scene, it’s time to animate it along with the footage! To do this simply go to the beginning of the timeline and create a keyframe for the Center whilst making sure that the light is placed where you want it to be (in this case it is placed on the window).


Then move forward in the timeline using the player head, until the window moves off screen. Move the light to the new window position and it will create a new Center keyframe so that it’s movement follows that of window.
Sometimes it might make sense to move the light away from the scene completely so that it follows the placement of the light source off screen.


How to Add a Lens Flare
To add a lens flare, go to the Effects & Presets panel and search for ‘Lens Flare’ and the click and drag it directly onto the footage to apply it.
This will generate a default lens flare to the scene which doesn’t look realistic and most likely won’t fit your scene.


We will need to make some adjustments to this. So let’s start by moving the lens flare to where the light will be coming from.


Next we will need to go to the Effect Controls panel and play around with the settings there to make the lens flare look more natural. For this tutorial we have done the following:
- Lens Type: 105mm Prime
- Flare Brightness: 50%


And then just create a keyframe for the Flare Center at the beginning of the timeline and then at the end of the timeline move the position of the light to create another keyframe as you did with CC Light Rays. This will create the same movement as before so that the light follows the position of the windows.


Next we can decrease the Brightness and increase the Contrast to accentuate the lights and make the scene look more moody and mysterious. You can do this by adding the Brightness & Contrast effect from the Effect & Presets panel.


How to Add Volumetric Lighting with a Solid Layer
An easy and simple way to add volumetric light in After Effects would be with using a solid layer. Go to Layer > New > Solid and create a white solid.


Then use the Pen Tool (G) to create a rough shape for the light.


Now I’ll hit F on the keyboard to bring up our feathering properties and feather it to your liking.


Then hit T on the keyboard to bring up the opacity properties and bring the value right down to around 20% to make it look more natural.


And finally we’ll do some basic camera tracking as we did with the two previous lighting effects! Simply create a keyframe for the Mask Path at the beginning of the timeline and then at the end of the timeline, move the position of the shape to match the light source of the footage to create another keyframe. This will create the same movement as before so that the light follows the position of the windows.


And here we have the two scenes so that we can compare them side by side. The top image is what we started with, and the bottom image is what we have created!


So there you have it! A few great ways to create some volumetric lighting to your scenes in After Effects. I hope you’ve enjoyed this tutorial on how to ceate volumetric lighting in After Effects. If you’d like to learn more cool After Effects skills, we’ve got some more tutorials for you:


 Create Cinematic Lighting in After Effects


- Essential After Effects Keyboard Shortcuts: Quick Guide


- How to Make a Double-Exposure Effect Video in After Effects
- How to Use Direct Sunlight in Environmental Lighting and Portrait Photography
- How to Add Light Rays in Photoshop With Your Own Brushes
- Collage Animation in After Effects


