When you’re getting into makeup for portrait photography, you’ll see a lot of terms like primer, concealer, foundation powder, and more. In this tutorial, you’ll find out what these types are and what they’re typically used for.
Let’s talk through the products to use in the order that you might use them in a typical makeup look.
1. Exfoliate & Moisturize
First things first, you’ll need to exfoliate and moisturize the skin. This has more to do with the skincare prep that we’ve talked about in previous tutorials, but it’s very important to prepare the skin before applying any makeup products.
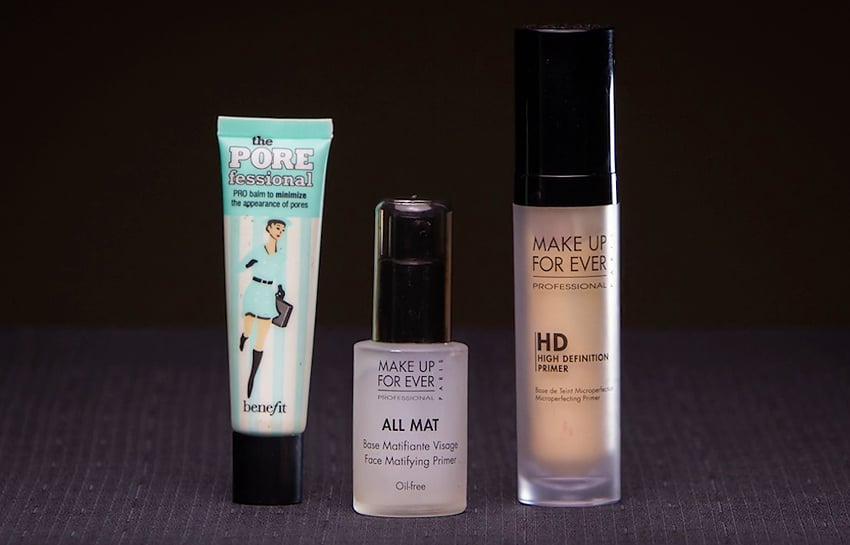
2. Face Primer
The first product we’re going to apply to the skin is a primer. A primer is very important because it has a couple of different jobs. First, it’s going to allow your skin to feel like a smooth, clean canvas. Primer is going to fill in any fine lines and blur any pores that might be visible. Finally, it acts like a glue so that your makeup has something to adhere to and will stay on all day.


A silicone-based primer is typically the best for any photography or video purposes. This type of product is going to allow movement in the facial features of the skin without the makeup looking cakey or heavy on top. It also creates a barrier so that any oils produced by the skin don’t come through and oxidize or darken the makeup as it wears throughout the day.
Most primers are translucent, but we do have some colour-correcting primer options as well. If you need to neutralize or camouflage any skin concerns, this is one step where you’d be able to neutralize.
3. Eye Primer
The next product is eye primer. Eye primer is very different from a face primer. An eyeshadow primer is going to allow for maximum colour payoff with any eyeshadow pigments that you use. It’s also going to allow for a long wear throughout the day. They do come in skin-tone colours to balance out any of the discolouration that’s normal around the lid of the eye, but most of them are translucent.
The last thing that an eye primer will do is prevent any buildup of product in the crease of your eye.
4. Concealer
The next product to talk about is a concealer. A concealer is meant to brighten or hide any specific areas that you don’t want seen. Most concealers are either going to brighten underneath the eye or hide blemishes.
Typically, one shade lighter of concealer is going to brighten the under-eye area, and one shade darker is going to hide any blemishes on the skin. Blemishes are not something you want to highlight, so you’ll definitely want to use a colour that is either your skin tone or a shade darker than your skin tone.


Concealers should always be moisturizing or hydrating, something that is either a cream or a liquid. Typically, I don’t suggest powders as a concealer as they just don’t provide enough coverage.
You can use a colour-correcting concealer, or you can just use a skin-tone shade. For lighter skin tones, choose a colour that’s going to be more on the pink side. For light to medium skin tone, a peach shade of concealer is best. For a tanner skin, use more of an apricot shade. And for really deep, rich skin tones, a true orange is your colour-correcting concealer.
5. Foundation
Foundation is going to even out the complexion of the skin. There are three main types of foundations, which are liquids, creams, and powders.
Typically, powders are going to be lighter in coverage, but they’re also great for mattifying the skin. So you’ll want to apply a powder foundation over either a liquid or a cream.
Foundation creams come in either medium or fuller coverage, whereas foundation liquids you can find in sheer, medium, and fuller coverage.


Finding the right foundation is typically the hardest thing that you can do when it comes to makeup. You have to understand a few things to be able to accomplish a correct match in the foundation.
First, it’s very important to understand surface tone. Surface tone is the colour that’s visible on the skin’s surface. So that’s either light, medium, or dark, and there are a few conditions that can actually influence the skin’s surface tone. Some examples of those could be rosacea or acne.
The second thing that you want to understand is undertone. The skin’s undertone is the colour that’s just underneath the skin. It can be found the same throughout your body, and it rarely changes—you’re born with it, so it’s a colour that you will always have.
There are three categories of undertones. There are red, yellow, and neutral. Red is also known as pink or rosy, yellow is also known as warm or golden, and neutral is going to be a combination of the two.
How to Figure Out Skin Undertone
There are a few tests that you can do, and it takes a lot of practice. It’s not something that’s immediately visible to the eye.
One of the tests that I’d suggest for you to try is the paper test. This entails holding a piece of paper up to your complexion. You should be able to see the colour of your complexion’s undertone showing through in comparison to the white piece of paper.


In comparison to the white piece of paper here, we have a bit of redness. So I would say that we have a slightly rosy undertone.
If you can’t quite tell with the paper test, another way is to look at the veins on your wrist. If you look at your wrist and you can’t see immediately the colour of your veins (it helps sometimes to take two fingers and press downwards), the flash that you see once you let go will be either a green or a blue/purple colouring.
If you see that your veins are naturally more blue/purple, then you’ll have a rosier undertone. If you see that the flash from your veins is green, then you have a more golden or yellow undertone. If you can’t tell, you’re a mixture of both.
6. Eyeshadow & Eyeliner
Eyeshadow is a pigment in either a powder or a cream formulation that’s used to accentuate the lid. The colour of eyeshadow that you’ll want to choose to accentuate the eye for a natural look is a variation of brown.


Another product I’m sure you’ve heard about is eyeliner. Typically, eyeliners will come in either a liquid or a pencil form. The pencil is a little bit more goof-proof because you can smudge it versus the liquid, which is going to create more of a precise, clean line.


7. Mascara
Mascara is going to define the eyes by adding length and volume to the lashes. Again, for a natural look, we’re going to stick with those brown, brown/black, or black shades. If you have very fair skin, I would highly suggest sticking with a brown shade so it doesn’t add too much unnatural weight to your look.
I wouldn’t necessarily suggest using mascara for a basic makeup look for men, but if a man has very fair lashes, he might want to apply just a little bit of a brown mascara so that it doesn’t look as if he’s without lashes.
For a photo shoot or a longer wear, I would highly suggest using a waterproof formulation of mascara—that way, you don’t get any smudging throughout the day.
8. Eyebrows
There are a few things that you can do for the brows. For both men and women, I always suggest at least filling the brows with a bit of powder. If you need some shaping to the brow to either give more symmetry or add some length to the brow, using a soft pencil is going to be ideal for adding some definition.


9. Mattifying Powders
Mattifying powders are the last step that you do in your makeup. There are also highlighting, contouring powders that you can use to accentuate the natural features in the skin. Typically, highlighting powders are going to bring forward or catch the eye, whereas contouring powders are going to be darker or will create a shadow and kind of recede.
You can use those powders to enhance your look and then mattify the whole look by sweeping a powder all over the complexion to minimize shine.


Conclusion
In later tutorials, we’re going to take a look at how these products are specifically used by doing some demos on models. Make sure to check out the next tutorial, where you’re going to see some of the tools that are used to apply these products to the face.

