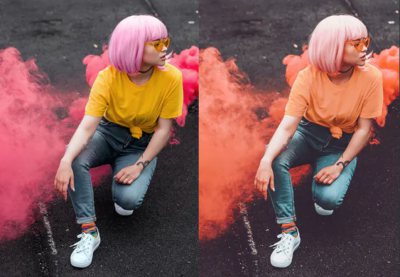
The editing presets in Adobe Lightroom CC are extremely helpful to use for two main reasons:
- They offer a recipe of visual aesthetics, or presets, for you to try out on an image.
- They show how the controls in the editing panel change to achieve each preset, so you’re able to learn how to achieve certain effects and apply that knowledge to future photographs.
It also happens to be extremely fun to see images transform before your eyes so quickly and easily.
In this tutorial, you’ll learn the short, simple steps it takes to apply editing presets in Adobe Lightroom CC. Check out the options Lightroom CC provides, and read the steps that follow. You’ll learn how to take your images to the next level of dazzlement.
How to Use Editing Presets in Lightroom CC
The Basics
Lightroom CC is a cloud-based app that allows you to work seamlessly across desktop, mobile, and web. Powerful but simple, it provides image editing tools that are intuitive to use. And because it’s cloud-based, it allows you to retain your edits across your devices, share photos easily with others, and enjoy the peace of mind of automatic back-ups. Lightroom CC provides you with a slew of editing presets, allowing you to experiment with color, clarity, vignetting, and more.
Creative Cloud plans for Lightroom vary from $9.99/month to $19.99/month and come packaged with other perks, apps, and GBs of cloud storage. (Businesses, students & teachers, and schools & universities are offered other plans and pricing.) You can also try it out by activating a free seven-day trial.
1. Open Lightroom CC and Select an Image to Edit
First step: Open the application and click on the image you want to edit.


2. Click the Edit Icon
Access the editing presets by clicking on the Edit icon in the upper right corner.


3. Click Presets
Click on Presets at the top. Doing so reveals a panel of category titles for all of the presets.


4. Click a Category Title
To access a preset, first click a category title. The Creative category title, for example, comprises quite a few presets, from Desaturated Contrast to Warm & Moody.


5. Experiment With Presets
To try out how a preset will look on your image, simply hover over the preset. I hovered over Desaturated Contrast. You can see the original version in the bottom left corner. I like how the preset allows the rock I collected on the coast of Spain to be less overpowered by the busy, colorful background, so I clicked on Desaturated Contrast to apply the preset to my image.


6. Observe the Editing Controls
Click on any of the editing controls in the editing panel, and see how a specific preset changes the controls. For example, when I clicked on Light, I learned that Whites increased and Blacks decreased to achieve the Desaturate Contrast preset. Taking note of these changes teaches you how various visual effects are achieved, so you can apply that knowledge to future images.


7. Apply Multiple Presets
More than one preset can be applied to an image. Click on all the presets you want to use. I decided to apply Heavy Grain to the image to give it the wistful aesthetic of film.


Then I also added Heavy Vignetting to further showcase the rock.


8. Revert a Preset
To reverse a preset you have applied, click Edit > Undo Apply Preset to eradicate the most recent preset you applied.


You can also reverse a preset by clicking on the three dots and selecting Reset Edits. Alternatively, you can use the Shift-R command on your keyboard, or click Photo > Reset Edits.


9. Make Multiple Versions of Your Image
To make more than one version of your image using different presets, right-click and select Duplicate 1 Photo.


Doing so creates a copy of your image to which you can then apply new presets if you want. Image copies are displayed in the bottom left.


You can also create a version of your image and give it a name. Click Photo > Create Version.


Then enter the filename for the version.


10. Access Versions of Your Image
To access versions of your image, click on Versions at the bottom right.


Enjoy—and Learn—Using Editing Presets
Lightroom CC’s editing presets apply aesthetics that can change your image drastically, ever so subtly, or wherever you want in-between. It’s quick, easy, and fully customizable. And by monitoring the controls in the editing panel, you get to see exactly how the aesthetic was achieved so that you can apply that knowledge to future images. A win-win!
Keep Learning About Lightroom and Photography
Here are a few more free tutorials and resources to help you study Lightroom and photo editing via presets:


