What good is a photo if you can’t find it? The answer: No good. Making images is just one part of the process. Organizing them is another, and it is just as essential. Maintaining the organization of an archive of images might sound boring, but the alternative is an even bigger bore, i.e.: endlessly scrolling through images in search of one.
In this tutorial, you’ll learn the various ways you can organize your images using Lightroom CC. Check out how easy it is to create albums and folders, stack photos, assign keywords to images, and rate and flag them by reading the steps that follow. The next time you go searching for an image, you will thank yourself!
How to Organize Photos in Lightroom CC
The Basics
Lightroom CC is a cloud-based app that allows you to work seamlessly across desktop, mobile, and web. Because it’s cloud-based, it allows you to retain your edits across your devices, share photos easily with others, and enjoy the peace of mind of automatic back-ups. It also syncs the folders, keywords, and other features that let you search and find images within the Lightroom ecosystem with ease.
Creative Cloud plans and pricing for individuals vary from $9.99/month to $19.99/month and come packaged with other perks, apps, and GBs of cloud storage. (Businesses, students & teachers, and schools & universities are offered other plans and pricing.) You can also try it out by activating a free seven-day trial.
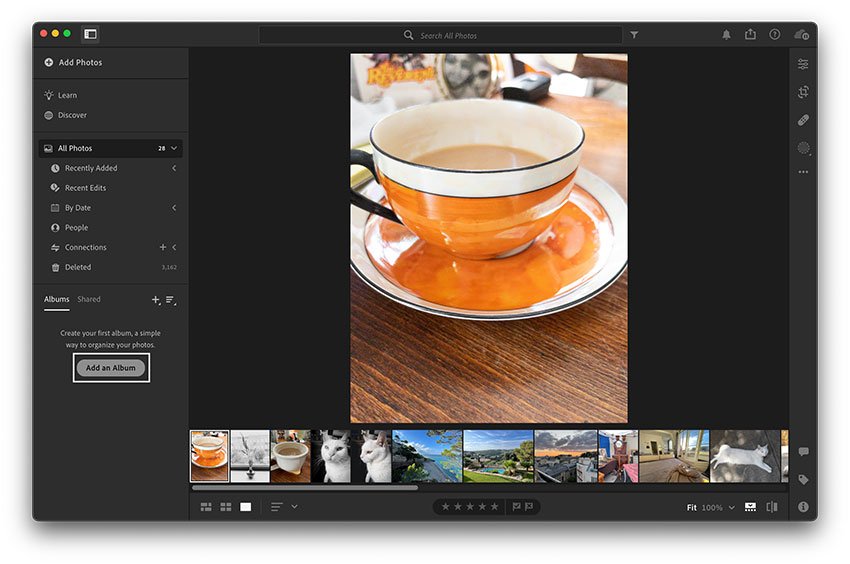
1. Open Lightroom CC and Create an Album
First step: Open Lightroom CC. Then tap Add an Album at the bottom of the panel on the left.


2. Enter a Name for the Album
Type in the name of the album. If beforehand, you selected an image you want included in the album, check the box next to Include the selection. Then click Create.


3. Add Images to the Album
To add images to the album, click and drag the image into the album. Or, select the image, right click, select Add 1 Photo to Album, and tap the album name.


4. Create Additional Albums
Click on the Plus [+] Icon, followed by Create Album, to create more albums.


5. Create Folders for Albums
Click on the Plus [+] Icon, followed by Create Folder, to create a folder.


6. Enter a Name for the Folder
Type in the name of the folder. Then click Create.


7. Place the Albums into a Folder
Click and drag one or more albums into the folder.


Those albums are now displayed within the folder.


8. Stack Photos
Select the photos you want to stack (or group) together.


Right click the images and click Group Into Stack.


Or go to the Edit Menu and select Stacks, followed by Group Into Stacks.


To ungroup images, right click on the stack and select Ungroup Stack.


9. Add Keywords to Photos
Select the photo(s) you want to add a keyword to.


Under the View menu, select Keywords. Or click on the Tag icon in the lower right corner.


Enter the keyword(s) in the Keyword pane that describe the image.


10. Rate or Flag an Image
Select the photo(s) you want to rate or flag.


Right click on the image and select Set Rating, followed by the number of stars you want to give the image.


Or right click on the image and select Set Flag, followed by Pick or Reject.


Alternatively, you can rate and flag images after they have been selected by clicking on the Star and Flag icons at the bottom.


Create a Searchable Archive by Organizing Your Images
If you can’t find an image, it’s as good as deleted. Lightroom CC gives you a lot of options to keep your photos organized and searchable. Creating and organizing folders, stacking photos, assigning keywords to images, and rating and flagging images allows you to perform searches that quickly and efficiently unearth the images you are looking for, saving you time and frustration.
Keep Learning About Lightroom CC and Photography
Here are a few more free tutorials and resources to help you study up on Lightroom CC and photography:


 PhotographyHow to Create Custom Presets and Add Instant Looks to Photos in Lightroom CC
- Photography10 Top Instagram Look Presets and Color LUTs for Lightroom CC and Mobile
- PhotographyLightroom CC vs. Lightroom Classic CC: Which is Right for You?
- PhotographyHow to Use Curves to Change Contrast and Tone in Photos With Lightroom Classic
- PhotographyHow to Make Look-Up Tables in Lightroom Classic (DIY Creative Color LUTs)


