If you’re a photographer and you’d like to know more about lenses, then you’ll love our free course, What Every Photographer Should Know About Lenses. In this lesson, you’ll learn how to compress space with photography lenses.
How to Compress for Composition With Photography Lenses
Higher focal length lenses compress an image and make people’s faces look more pleasing. This concept can be useful when it comes to composing your photos by controlling how large the background elements are and how much background is seen in the image.
In this lesson, you’ll learn how to use focal length to change the composition of background elements.
Better Backgrounds
Let’s look at what happens to background elements and how we can recompose those using focal length. We’ll take a framing of something and keep the main element about the same size, then we’ll change perspective and move back, change focal lengths, and see what happens to the background elements and how that affects our image.


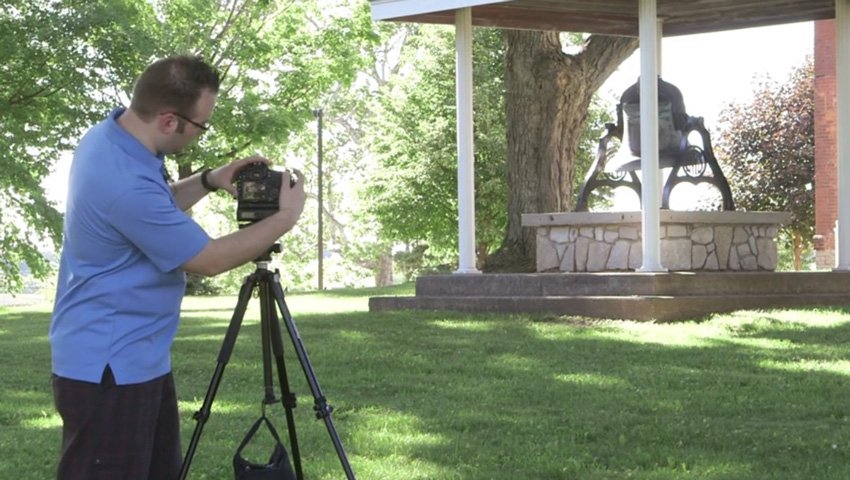
In this example, you can see an old bell from the 1830s, some trees, the sky, and part of an old brick building. On the camera is a 17-50mm lens set to 17mm.


In the photo, you can see all the elements that we’ve just talked about.
Now let’s see what happens to the background elements when the camera is moved back and the focal length changes to something a little bit higher.


The camera is about 25 feet further back than before, and now at 50mm the composition is so that the bell is roughly the same size.


What you can see between the two images is the size of the background and what’s happening in the background changes, plus a little bit in the foreground because the camera is further back.
Here are the two pictures side by side so you can see better. You can see the space between the bell and the building looks smaller from further back (the second photo). The use of a higher focal length compresses things so the distance between objects appears to be less than it actually is.


If you look at the ground between the two photos, you’ll see that it looks as if there’s more ground between the bell and the building in the first picture, and the building looks bigger in the second.
Obviously the size of the building didn’t change between the two perspectives, but because it’s a narrower field of view, it changes what’s happening in the background, making background elements look larger.
Let’s Try Another Example


This time, we’ll look at what happens to the building that’s behind this gazebo, and it should become more obvious what happens to perspective when the focal length is changed.
The camera is quite close to the gazebo and is set to 17mm, so it’s mostly filling the frame.


There’s a kind of backlight, like a sun-dappled effect. We can see sky, the building, and quite a lot of clutter in this photo. With it being quite wide, it’s not the best focal length.
So we’re going to move back and change lenses and try to really compress this to get the gazebo about the same size and hopefully make a big difference to the background elements.


This is about 35 or 40 feet further back than before, and the camera is shooting at around 115mm with a 70-200mm lens.


This looks dramatically different. Even though the gazebo is about the same size, they look as if they were photographed in two completely different locations.


When we use a wide-angle lens, because of the exaggerated proportions that it gives, it makes the gazebo look as if it’s a completely different shape. It looks pointier and more angular; it has more depth to it. By comparison, with the telephoto lens it’s much more compressed, so it looks flatter. We can see more of the roof, and what’s going on behind there is a lot more pleasing.
There’s not one that’s wrong or right, but it just goes to show there’s a range of different looks that you can get by moving from your current position to a new one and then changing your focal lengths, and you can see how just one focal length would be limiting.
Summary
You’ll notice the trees on the wide-lens photo (right) look as if they’re further apart, and the background looks a little less dense. On the tighter photo (left), there’s a little bit more background filling.


The perspective and focal length are changing to keep the main objects roughly the same size but with a drastic change to the background elements, and that’s the really interesting thing about changing your position and as a result, your perspective. You can really get a lot of interesting looks, and you can drastically change up the composition of your frames.
Learn How to Use Lenses
Keep learning about how to use photographic lenses with these free tutorials.


How to Use Medium Telephoto Lenses for Photography
Setting the Standard: What’s a Standard Zoom Lens?
When and How to Use Wide Angle Zoom Lenses
Primes vs Zooms: Pros and Cons of Fixed Focal Length Lenses for Photography


About the Authors
David Bode created the video course that includes this lesson. Dave is an expert on video and audio production, and he lives in the upstate NY area. He works as a camera operator, editor, inventor, motion graphics designer, recording engineer, and studio musician.
Marie Gardiner created the text version of this lesson. Marie is a writer and photographer from the North East of England. After gaining her degree in Film and Media, Marie worked in the media industry, before leaving to set up the business she runs with her partner: Lonely Tower Film & Media. Her photographic work focuses on landscapes and industrial ruins, particularly those of the North Pennines as she continues to work on her long-form documentary project Changing Landscapes.
This tutorial was edited and published by Jackson Couse. Jackson is a photographer and the editor of the Photo & Video section of Envato Tuts+. He lives in Canada.

