Join motion designer Tim Lucke as he walks through his character animation process in Adobe After Effects. He’ll use expression controls, track mattes, and character rigging to bring an animated intro to life!
In this lesson, Tim will show you how to animate trim paths in After Effects, and for more, you can watch the whole free After Effects course Master Motion Design – Dynamic Character Animation in After Effects.
How to Animate Trim Paths in After Effects
Adobe After Effects Trim Paths: What are They?
Before we start, let’s take a quick look at what After Effects trim paths are. In shape layers, or layers that have been converted to a shape (like text or illustrations) you can add trim paths. These will let you define the ‘start’ and ‘end’ point for which you can then set animation.
“If the Trim Paths path operation is below multiple paths in a group, then you can choose to have the paths trimmed simultaneously or treated as a compound path and trimmed individually.” – Adobe
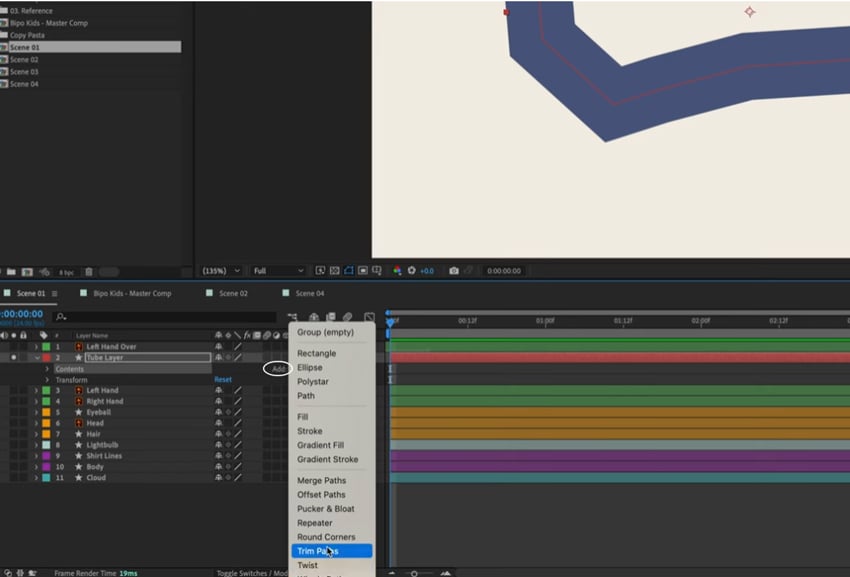
How to Add a Trim Path in After Effects


As mentioned, any Shape layer will have this option, so on the layer, click Add and from the pop out menu, choose Trim Paths.


The trim path will appear at the bottom of your shape layer stack and so will affect everything that’s above it. There are two main properties when it comes to trim paths, the start and the end.
Setting a Keyframe


If we roll back the end – circled above – you can see how the shape will animate.


The start point of the animation is nothing on screen. We can hit the little stopwatch to set a keyframe at that stage.
From previous lessons in the course we know that we’re hitting our animation movements to the beat of the music, so for this we want about a second and a half, so we can move along the timeline to that point and then go ahead and set a second keyframe for the end point.


You can see I’ve then dragged the end point up to 100%.
Adjusting Timing


Next, we want to have the line speeding in first and then we have a kid who pops up above the line, so we can get him to pop up at half a second and then have him there for another second.


You can see above I’ve added a keyframe to represent where the kid pops up and what we just mentioned above, and then I’ve duplicated it so these two keyframes are now exactly the same.
You can then play it through and see how it works. The way it is here meant there was a bit of a pause or break, so I can just move the second keyframe from the right over a little so that the animation at the end is really quick, maybe two or three frames.
In the next lesson, we take a look at smoothing out that animation by easing keyframes.
After Effects Templates From Envato Elements
Envato Elements has thousands of After Effects templates to choose from and you can download as many as you like when you sign up for a monthly subscription. It’s not just templates either, you can up the quality of your video production with music tracks, SFX, stock video and much more.


It’s also worth checking out Envato Elements monthly free files, which often include free After Effects templates.
More Great After Effects Tutorials and Templates


 DaVinci Resolve vs Adobe After Effects (Which is Best for 2023?)


- 10 Top Spring Templates for After Effects
- How to Use Advanced Motion Tracking in After Effects
- 5 Top Text Presets for After Effects


About This Page
This page was written by Marie Gardiner from the transcript of a course by Tim Lucke. Marie is a writer, author, and photographer. It was edited by Gonzalo Angulo. Gonzalo is an editor, writer and illustrator.

