If you’re a filmmaker and you’d like to know more about editing, particularly colour, then you’ll love our free course, How to Colour Grade Video. In this Da Vinci Resolve tutorial, you’ll see examples of natural colour grading by using exposure adjustments in the shadows, mid-tones, and highlights in combination with masks and motion tracking.
Colour Grading and Contrast in DaVinci Resolve: Neutral, Natural, and Beyond
Colour Correcting Your Shots
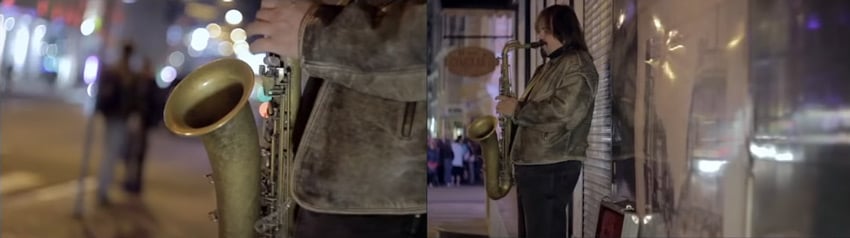
First, here are two stills from some shots of a saxophone player that have been colour corrected.


And here’s what they look like without any colour correction:


A little bit of colour correction normalises the colours and helps them to work together, so let’s take a look at what goes into that. At first glance, the colouring might look a bit drastic, but once you see the clips played, you forget what it looked like before, so you can push it a little further.
Adding Contrast and Motion Tracking
Isolating the Focus of the Shot and Tracking
In the first node (01), there’s a little colour correction, what’s known as a Base Grade. In node 02, the player’s body and horn are being tracked, so the changes will focus on those. The idea is to isolate the main focus of the shot and boost the tones.
Now Do the Opposite to the Background


In the third node, it’s the opposite of the one before, targeting the tones outside the highlighted area and pulling them down so they aren’t distracting.
Keyframe Animation


The last node (04) is a gradient with a keyframe animation to help it stay with the action as the camera moves a little in the shot. If your camera moves, then you’ll likely need to do some kind of tracking or animation so that you don’t get the effect sticking in the frame and becoming obvious when the picture, or your subject, shifts.
The gradient here is taking down the shadows and mid-tones a touch and making more of the highlights to draw the eye.
Second Shot


I used a very similar technique for the second shot. The idea was not to do too much to the colours because the skin tones already look good, but to better draw the eye to the subject and enhance the narrative.
Adding Masks and Motion Tracking


In node 02, there are a couple of masks. The circle one at the top right of the shot above is called a Power Window in Resolve. Then there’s one that tracks the horn, and then one over the end of the horn, and they’re all motion tracked so they follow the movement in the shot really well.
The node is doing quite a lot of things. It’s darkening everything down, mostly in the mid-tones but also in the shadows, and that seems to almost relight the horn—it really pops. The way that the shape was created and the feathering of the horn add some shading to the left-hand side (our left), and that adds a lot of contrast.
Darkening the Background


Here, in node 03, it’s the opposite of the previous node. This time, the highlights are bumped up, and a bit of contrast is added.
Adding Saturation


The last node (04) is adding a bit of saturation and helping it to match that first clip a little better.
Summary
This is not a highly stylised grade, not that blockbuster cinematic look where you have very blue shadows and warm highlights and mid-tones. It’s not day-for-night or a bleach bypass or anything really gritty. It’s basically just colour correction pushed that little bit further to create natural colour grading. The colour correction on its own is fine and was quite nice looking, but taking it to another stage and adding more considered contrast can really help to use natural colour grading for a feeling of continuity and to help tell your story.
More Articles on DaVinci Resolve


10 Top YouTube Video Templates for DaVinci Resolve (1 Free)
How to Make Audio Sound Like a Phone Call Using Effects in Fairlight (DaVinci Resolve)
10 Top Intro Templates for DaVinci Resolve | Motion Graphics Video Openers
10 Top YouTube Shorts Vertical Video Templates for DaVinci Resolve


About the Authors
David Bode created the video course that includes this lesson. Dave is an expert on video and audio production, and he lives in the upstate NY area. He works as a camera operator, editor, inventor, motion graphics designer, recording engineer, and studio musician.
Marie Gardiner wrote the text version of this DaVinci Resolve tutorial, and it was edited and published by Jackson Couse. Jackson is a photographer and the editor of the Photo & Video section of Envato Tuts+.

