Welcome to another lesson from our course, Intermediate Flash Photography. In this lesson, you’re going to learn about a lighting pattern called split lighting.
You’re also going to learn about broad lighting, short lighting, and rim lighting. You’ll discover how they affect your photos and when to use them. By the end of this lesson, you will have a very solid set of tools to use whenever you need to light a person for a portrait.
Let’s get started with our final lighting pattern.
Split Lighting
Split lighting is a very easy lighting pattern to create and use. It’s called split lighting because, when done correctly, the lighting will split the face right down the middle of the nose into a light side and a dark side. Here’s an example of split lighting:


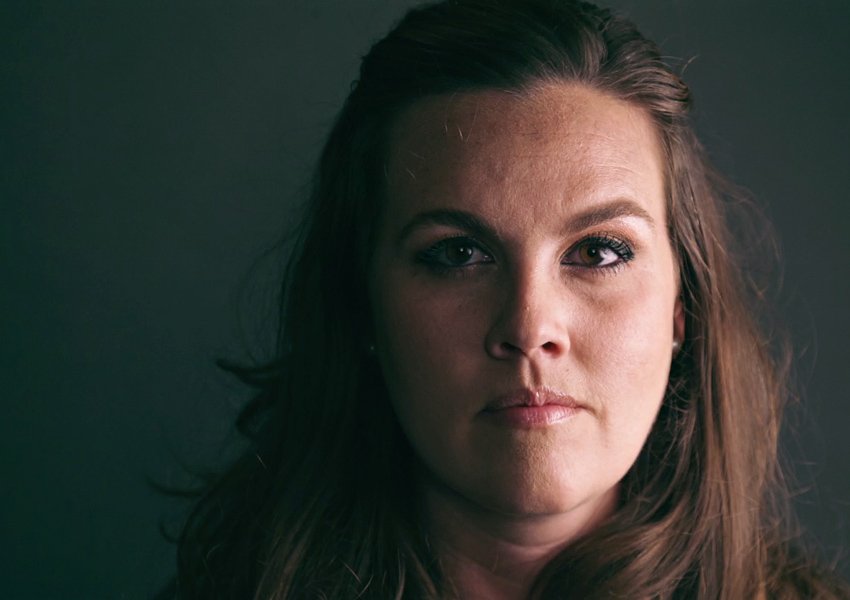
As you can see, split lighting can be quite dramatic and moody. So, in this form, it’s best reserved for special portraits. Split lighting is useful for demonstrating how to find the edges of your lighting, the transition areas between light and dark, and for comparison with the other styles we’ve seen in this series so far.
Split lighting is also pretty easy to create, and is basically the opposite of butterfly lighting; we’ll want to bring our key light around our subject to about the 90-degree position. Somewhere around here:


As you can see, it’s called “split” lighting because we can see a line right down the middle of our subject’s face. Their nose, lips, and chin have been divided, or split, into a bright side and a dark side.


This is pretty much perfect split lighting. As you can see, it’s quite dramatic and a bit foreboding. Because of this, you don’t see it used a whole lot, but it can be perfect for a specific use.
One way we can take some of the drama out of split lighting is by bringing in a reflector. Let’s bring in our silver reflector and see what that does to our subject.


As you can see, the reflector brings a bit of brightness onto the shadow side, and this creates an interesting look. Now let’s see a portrait made with this lighting setup.


Posing Variations
So that is split lighting! If you’ve also followed the other lessons in this course, you now have four lighting setups that you can use. To tell you the truth, you can pretty much make any portrait when you know only these four lighting setups. It might seem that things could get pretty boring, pretty fast with only four choices of lighting, but let me tell you how we’re going to remedy that.
You may have noticed that in every example, our subject has been facing directly into the camera and that we’ve been moving the lights around them. Well, one of the easiest ways to change things up is to start to change the direction our subject is facing in the image.
Let me show you an example. Here’s a photo with standard Rembrandt lighting, looking directly into the camera.


Now here’s the same lighting with our subject just turned slightly.


And here’s the same lighting again, with our subject turned the other way.


And then here’s the same lighting one more time, with the subject turned 90 degrees away from the camera.


It’s crazy to me how much the feeling of an image can change without changing the lighting or the subject. In fact, in all of these images, the only difference was in moving the camera around the subject in a semicircle. You could also get the same results by having your subject turn away from your camera, but then you would also have to move your lights to stay with your subject.
Now that you have seen this in action, let’s dissect these photos a little bit and figure out exactly what’s going on and give us some definitions so that we have some common vocabulary to describe these different photos.
Let’s start with this image where our subject is facing slightly in this direction.
This is what we would call broad lighting. Broad lighting is when the side of the face with the most light is closer to the camera, and the shadow side of the face is further away from the camera. Broad lighting generally makes your subject’s skin look softer and more even by hiding wrinkles and skin irregularities.
Broad lighting also makes your subject’s face look wider, and most people I don’t know don’t really like that, so you need to be careful about who you’re photographing when you’re using broad lighting.
The opposite of broad lighting is short lighting. In short lighting, the side with the most light is away from the camera, and the shadowed side of the face is closer to the camera. Like this photo:
Short lighting is a very flattering light in that it slims down your subject’s face and makes them look thinner, which many people like. On the other hand, short lighting also accentuates wrinkles and skin imperfections and texture. In my experience, this is a useful position for portraits for most people, with the exception of some people with very thin faces. Once again, it’s all about learning how to read the face of your subject and then deciding which lighting patterns work.
So if we take short lighting to the extreme, we get what’s called rim lighting or profile lighting. Rim lighting is a very dramatic light and definitely gives a certain feel of mystery and thoughtfulness to an image.
When we do rim lighting, the camera will almost be shooting right into the key light, so it’s important to make sure that you’re not getting any lens flares.
Now we can take our four portrait lighting patterns and mix them up with these three new lighting directions to get quite a lot of combinations to work with.
Here are just a few examples. This photo is short Rembrandt lighting:
The light part of the face is away from us, and the small triangle is closer to us.
And this is broad loop lighting, where the bright side of the face is closer to the camera, and the small shadowed side of the nose is on the other side of the camera.


The combinations go on and on from here, and I want you to go and make up some of your own and see which ones you like best.
In our next lesson, we’re going to move on from the simple portrait setups, and you’re going to learn how to add a second flash to your setups—once again, giving you more control and more creative freedom. Follow the full course to keep learning!

