Welcome back to ‘Intermediate Flash Photography‘. Over the next few lessons, you’re going to learn how to achieve vastly different portraits with simple and easy adjustments of your flash. Each of these lessons will go over one or two of the classic lighting setups, or lighting patterns, that have been used for hundreds of years by painters and photographers to get the results that they want.
For the sake of simplicity, we will start by using only one light to demonstrate all of these different setups, and then we will bounce some fill light in so that you can see how that works and how it affects our final image. In later lessons, we will add even more lights to modify these setups for subtle nuance.
Rembrandt Lighting
The first lighting pattern that we’re going to tackle is Rembrandt lighting.
This lighting is named after Rembrandt von Rin, the 17th century Dutch painter, who was known for his amazing use of light in portraits. There’s a reason that we still remember his name almost 400 years later, and if you want some great lighting inspiration, spend some time looking over his paintings and pay attention to how he used light to create drama in his images.
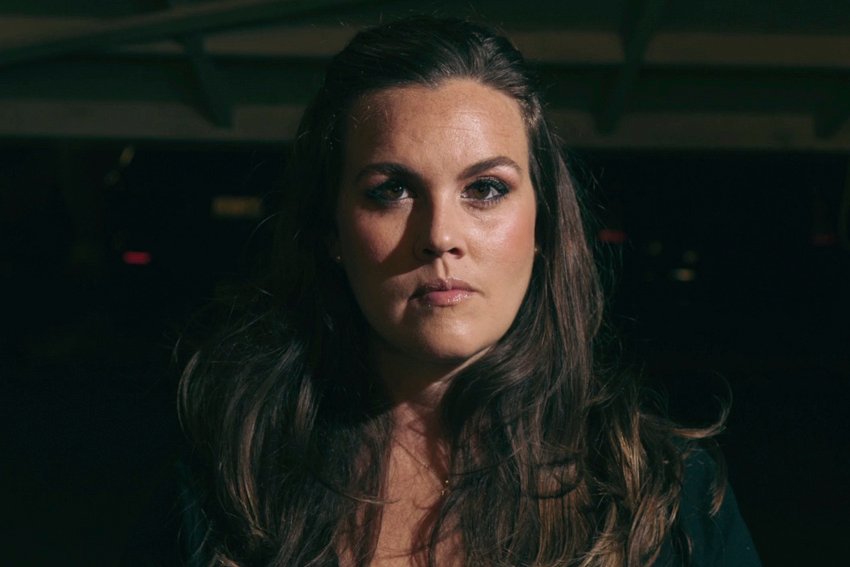
While Rembrandt used many different lighting styles, the one he is best known for is his portrait lighting. Here’s an example of classic Rembrandt-style lighting.


The easiest way to tell Rembrandt lighting from the others is that there will be a complete triangle on the upper cheek, on the opposite side of the subject’s face from the light source. Rembrandt lighting is known for creating drama while still looking very natural.
In all of the lighting setups that will be going over, Rembrandt lighting has its strengths and weaknesses. The main weakness being that this light will accentuate texture in the face. This makes it a great light for masculine portraits, but not always the best choice for some subjects and desired looks.
Like all lighting setups, you’ll learn that some people’s faces will simply not work with Rembrandt lighting. For example, when photographing someone with a small nose or whom has a very flat bridge to their nose, you might not be able to get the triangle on the opposite cheek.
As you practice and gain experience with different setups, you’ll learn how to read the faces of your subjects to determine the best lighting setup for each person.
Now, I know this is a flash photography tutorial, but I think the easiest way to show you how this works is to actually use a constant light so that you can see how the position of the light affects the overall image. You’ll be able to see how moving the light in real time affects the shadows and the light on the face, so watch the video for this course to see the full effect.
I’m also going to show you two different camera angles as we’re going along. This camera angle is from the position of the actual camera that you will use to photograph the picture, so will show you what your camera is actually seeing and what you want to see in your lighting.


The other camera angle will show you how I’m moving the light around and what position creates each look. So, let’s get started with our model Brianna.


Set the Main Light
The easiest way to start Rembrandt lighting is with what I call the 45/45 rule. If we draw a straight line out from Brianna’s nose, that’s 0 degrees, and if we draw a straight line out from her ear, that’s 90 degrees. So, we want to split that difference and that’s 45 degrees. Right here:


So, let’s bring in our light and place it right about there.


Next, we want to draw a line straight out of the top of Brianna’s head, that’s 0 degrees. And then we draw a line straight in front of her face again, that’s 90 degrees. We want to split that difference, and so we want the light to be coming from about 45 degrees above her head.
So I’m going to say right about here is 45 degrees:


In fact, that is just about perfect. What we’re looking for is this triangle under her right eye, because it’s opposite of our key light. We want the shadow from her nose to connect to the dark side of her cheek.


The triangle should be about the same length as Brianna’s nose, and we want it to be at the top about the same width as her eye. It really leads you right into seeing her eyes. That’s essentially what we’re looking at when we’re doing Rembrandt lighting.
Look for a Catchlight
What we want to do next is make sure that we’re getting a catchlight in both of Brianna’s eyes. You can see that in each one of her eyes up here at the top you can see this light reflecting in both of her eyes.


They look alive and they look bright, and that’s exactly what we want.
Add Fill Light With a Reflector
The next thing we want to do is bring in our reflector. This is going to help brighten up the other side of Brianna’s face, and will serve as our fill light. I’m using a silver reflective because it’s a little bit more efficient in doing the job, and again, we can look at the catchlights to see what we really are doing.


And that is it! This is pretty much perfect Rembrandt lighting. It’s very moody, it’s very dramatic, and I love it.
If you’re using a flash that does not have modelling light, you’re going to have a slightly trickier time getting the light just where you want, because you’re going to have take a picture, move your flash, take another picture, move it again, etc. It can be a little bit frustrating, but in the end, getting it right is really worth it.
So, Briana and I are going to have a little bit of fun shooting away.


I’m getting a little bit too much fill light for my liking. I want my shadows a bit darker and we can do this by moving the reflector just a little bit further away. It’s in the same position, but by moving it away we’re going to lessen the light that it’s adding to the scene.


Here are some of the final images of Brianna with the Rembrandt lighting.


As you can see, it’s a very natural looking and pretty dramatic looking light.
In the next lesson, you’re going to learn the two lighting setups that are my absolute favourites. Those are butterfly lighting and loop lighting. These are super flattering lighting patterns, and you can use them on pretty much anybody.


 PhotographyHow To Move the Flash Off Your Camera for Better Photo Lighting
- PhotographyHow to Bounce Your Flash for Soft Lighting in Portrait and Event Photos
- PhotographyPlaying With the Qualities of Light in Studio Portrait Photography
- PhotographyA Photographer’s Guide to Small Flash and Speedlight Features


