Microphone placement is critical for capturing high-quality audio. What do I mean by microphone placement? Quite simply, it means where you decide to place the microphone. The goal in microphone placement and pretty much all audio recording is a high signal-to-noise ratio.
Signal to Noise
Let’s break that down. The signal is the thing you want to record, and the noise is what you don’t want to record.
Let’s say for a second that the signal is a person speaking—so you have a microphone and the subject you are going to record. What is the noise? The noise is everything that isn’t the voice you’re trying to record.
These noise sources can come from all sorts of places. You have environmental noise: things like HVAC (cooling and heating), computers and other gear on set, or things like general talking and traffic. There’s an ever-growing list of things that could be considered environmental noise. On top of that, there’s also noise that’s generated by signal processing in the recording process. Some microphones will generate a bit of noise. Preamps will generate noise. The analog-to-digital converter generates noise. All of those you don’t want.
On the electronic side, that noise generally sounds like white noise or hissing, and depending on how loud that is, it can be problematic. With environmental noise, a little bit may be OK, but it’s still not the thing you’re trying to record. So the idea is that you have the thing you’re trying to record and the thing you don’t, and what you want to do is get a higher ratio of what you want to record (the voice) and a lower ratio of noise. So how do you do that?
Getting a Good Ratio
To get a good signal-to-noise ratio, you’ll want to have your microphone close to the sound source. Microphones aren’t magic—they will always work according to the principles of physics. The closer you get the microphone to the sound source, the more of that sound source will be picked up from that microphone.
Let’s describe a situation here. Let’s pretend that we take a microphone and we place it 3 feet from our sound source. Now, you’re going to hear your person speaking, and you’re also going to hear the environment that they’re in. No matter where they are, you are going to get a bit of reverberation.
In order to get a usable signal out of that microphone, you’re going to have to turn up the preamplifier. You’ll have to increase the gain, if you will, to get the voice at an acceptable level. When you do that, however, the noise will also be amplified. This is because the microphone doesn’t know what it’s listening for.
So what’s the solution? You’ll want to move the microphone closer. When you move the mic closer, the ambient noise stays generally the same, but because the microphone is closer to the sound source, the signal becomes relatively stronger. So what you’ll need to do to maintain a proper level is take your preamp and turn it down to get the voice at an appropriate level because if it was the same level at three feet away and you move it quite close to the sound source, it will be way too loud and we’ll get into clipping.
The effect now is that the voice is the same as it was when the microphone was three feet away, but because we’ve turned it down, the ambient noise in the space has also been turned down because of its relative position to the microphone. You’ve effectively given yourself a high signal-to-noise ratio. This is the goal for recording—it’s what you want to hear. The further away that mic is, the more ambient noise you’ll get, and you’ll also increase the reverberation. Now, that may be what you want, but for now we don’t, so get the microphone close to the sound source.
Microphone Pickup Patterns (Polar Patten): Omnidirectional and Unidirectional Microphones
Another factor that plays into mic placement in getting that high signal-to-noise ratio is the microphone’s pickup pattern, also known as a polar pattern. All microphones have a polar pattern, and that indicates how sensitive a mic is to the sounds coming from different directions.
So let’s imagine for a second that you’re in a dark room, and there’s a single lightbulb hanging from a wire in the centre of the room. The light will radiate in all directions from the light source. This is equivalent to a microphone with an omnidirectional pickup pattern, a mic that is sensitive in all directions.
If we add various shades to shape the light, we can start to make our light source more directional. If we equate that to microphones, we’re getting into unidirectional microphones. This is when the microphone is sensitive primarily in one direction. These two types of microphones are really all you need to consider. There is another type of microphone, the bidirectional mic, which records in two directions, but it isn’t applicable or relevant to this type of video production.
Microphone Shapes: Cardioid, Super-Cardioid, Hyper-Cardioid, and Shotgun Polar Patterns
In the realm of unidirectional microphones, you have a bunch of different shapes that determine how sensitive the microphone is to frequencies in that one general direction.
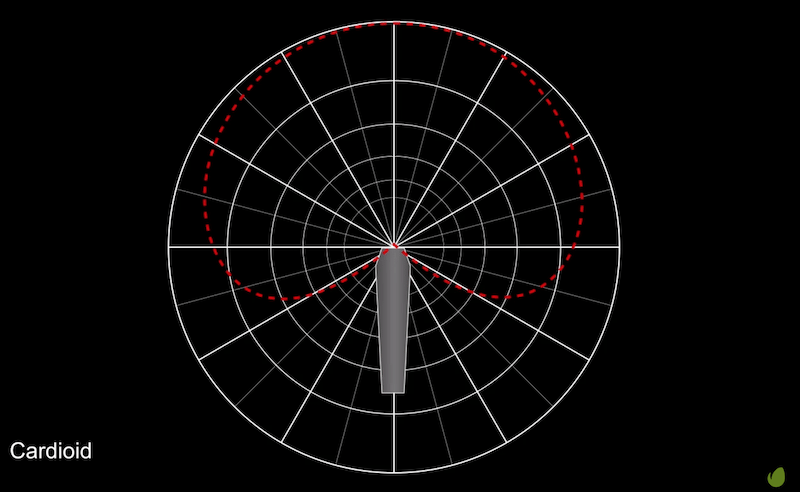
A cardioid pattern is so named because it resembles a big heart, and it is most sensitive directly in front of it while rejecting sounds directly behind it. If we take that cardioid pattern and make it narrower, it’s called a super-cardioid, and if we make it even narrower, it’s a hyper-cardioid. As they get narrower, they start accepting a bit of sound from the rear. I should say that these shapes for unidirectional polar patterns are generalizations. If you have two different cardioid microphones, the pattern may vary.


If we continue to narrow this shape, we will end up with a shotgun pattern. This pattern has a narrow acceptance from both the front and the back of the microphone, and it does a fantastic job of rejecting sounds from the sides.


Proximity Effect
Knowing about the polar pattern of a microphone is important because there’s an effect that can happen with unidirectional microphones called the proximity effect. The proximity effect in audio is an increase in the bass response or low-frequency response when the sound source is close to the microphone.
This is good to know because if you’re using unidirectional microphones and the distance is varying a good deal, this will cause the recordings to be a bit uneven, and that can be problematic. This doesn’t happen with omnidirectional microphones; they don’t show any proximity effect. Regardless of the distance, the mic should have the same sound quality tonally. With a unidirectional microphone, however, it becomes much more bass-heavy as it’s moved closer to the sound source.
That’s It!
Knowing about signal-to-noise ratio helps you understand that you need to get the microphone close to the sound source. Knowing about polar patterns helps us understand how to orient the microphone so that it picks up the sound you want it to pick up.
Now that you have an understanding of mic placement, signal-to-noise ratio, and polar patterns, you’re ready for the next tutorial. You’re going to learn how to get the audio from the microphone into your camera.
More Resources


