In this tutorial, you’ll learn how to set levels on your camera and how to make sure you’re getting enough signal without clipping. You’ll also learn what to do with the extra microphone channel, if you have one.
First, I want to show you how to set levels on a smaller form-factor camera. Let’s get started.
Setting Levels on a Smaller Form-Factor Camera
For this example, I’ll use my Canon 7D. To set the levels, I’ll jump right into the menu, where I have an option to set my recording levels. I usually have it set to Manual because Auto is pretty terrible most of the time. If I select Recording Level, I can use the dial on the camera to adjust the recording level. What that is doing is turning up or down the microphone preamp on the camera.
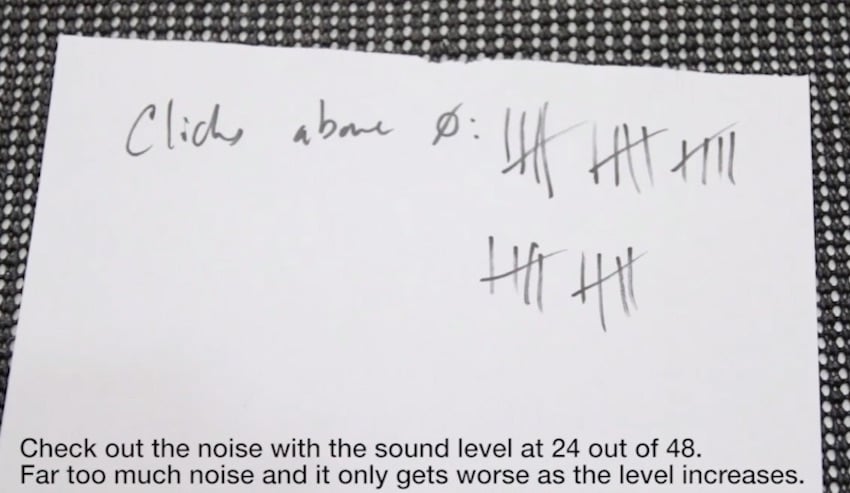
Now, these smaller form-factor cameras don’t have high-performance microphone preamps. There are some with better preamps and some with worse. This particular camera does not have very good preamps in it, so I set up a test to see exactly how these preamps perform. I shot a piece of paper with some marks on it, and every clip I increased the recording level one click on the dial. There are basically about 48 levels that you can set on the recording level for this particular camera. I didn’t record a clip for every level because I know these cameras, and once they get up about halfway, they start becoming pretty useless.


I knew if I got pretty close to half I’d be fine and as it turns out, that was pretty optimistic because this camera only performs reasonably well 19 clicks above 0. Past that, things start to become more noisy than I would like them to be. Sometimes you need to record with a little bit more gain because you have to get a good signal. If the noise is above -50db in the meters in my editing program, then I consider that relatively problematic. I can denoise it, but if I don’t have to, that saves me a lot of work.
Setting Levels
Let’s start setting the levels. What are the ideal levels? -12db is usually a pretty good place to shoot for. The idea with setting levels is that you want to get a nice juicy signal (-12db) before the noise, which is going to live way down off the meter. But at the same time, you also don’t want to be around 0db, because that indicates clipping.
Clipping is when the wave is chopped off at the top and the bottom. Some clipping can be recovered. Light clipping, for example, may be salvageable depending on the frequency content and what other sounds are going on. But you don’t want to record a clipped signal—it’s what we are trying to avoid.
If I needed to increase the gain, I could go to Set Levels, and if I turn it down to 0db the preamps would essentially be off and I wouldn’t be able to record anything. If I turn the dial one click above 0db, this will be the least amount of noise that I can get using this system, and going any further will keep on adding more and more noise.
That’s how all preamps work. If you turn them down almost all the way, they’re going to give their best noise performance. On the system I’m currently using, I can go about ten clicks, and that’s about where I’m comfortable pushing this camera. This is where I’m starting to hear some noise starting to be introduced, and that’s when the noise gets above -60db in the recording.
If it was the case that I couldn’t get enough signal (which I can with the preamp turned up one click) with this particular microphone with this wireless unit, then there are a couple of more things I can try to do to get more signal before I turn the gain up here.
Setting Levels on a Wireless Unit
On my wireless unit, the one thing I want to make sure is that I have the output set up right, and that I’m not attenuating the signal before it gets to this camera. Sometimes you do need to attenuate the signal because the camera is particularly sensitive. For this example, I don’t want to do that.
On the side, there’s an ATT setting, which stands for attenuation, followed by three settings; -20, -10, 0. Right now it’s set to the 0 position, which is what I want. If I turned the signal down, I’d have to turn the preamp up on the camera, which would introduce more noise.
There’s another switch on the side that I can set to Dual Mono or Balanced, and right now I’m taking a dual mono unbalanced cable and going into my camera. That is all set up properly.


If that didn’t work, the other option is to increase the gain on my transmitter. On the transmitter, there is an adjustable level, which is the preamp for the transmitter. What you can do is try turning up the preamp a little bit and see if that helps.
If you have to turn it up all the way, be aware that noise can sometimes be introduced when you push the transmitter’s preamps. The goal here is to boost your signal a bit so that you don’t have to stress the preamp in your camera system on these small form-factor cameras.
The other thing you want to watch out for on the transmitter mic pre is that you don’t want to turn it up to the point where you are peaking at the receiver. It’s possible that you can overload the transmitter and the receiver signal, and that will cause clipping in this system. That would be bad because on the camera it would look as if you have good-looking levels, but they actually would be clipped and would sound nasty. Now if you were monitoring that, you would hear it, and that’s why it’s so important to monitor your audio.
Setting Levels on a Camera That Has XLR Inputs
So what about setting levels for audio using a camera with XLR inputs? Basically it works the same way. If you’re working with just a shotgun microphone, then you’d just have to set the levels to where they would be appropriate. Once again, that will be around the -10db/-12db region.
On this camera, I’m using the same wireless unit I was with the DSLR, but now I’ve moved the switch on the side to balanced, and I’m going into only one of the channels with an XLR.
However, this camera has a feature in the menu where I can set both channels to channel 1. That’s useful when you only need one lav and don’t need any additional ambient sounds recorded. If I did want some ambient sound or if this was an interview and I was behind the camera and wanted to record what I was saying, what I would do is just leave this in the default setup. Then I would plug my main mic for the subject into channel 1 and set channel 2 to an onboard mic or set up another lav if that’s what I needed.
More Creative Resources
That’s it! Thanks for following along, and if you are looking for more creative resources, make sure to check out these:


