In this lesson from David Bode’s FREE Ultimate Premiere FAQ course, you will learn how to create and use proxies in Premiere Pro for a faster editing experience.
What Is a Proxy?
A proxy is a duplicate of a project’s source footage that is smaller and lower-resolution than the high-resolution original. Video proxies are created to stand in for raw footage during the editing process.
High-quality source footage like H.265 or H.264 in ultra HD, or even higher resolutions, demands a lot of hardware power and speed during the editing process, but you don’t really need to work with the full-resolution files when you’re editing. Using a proxy file—a smaller file—will make the editing performance much faster and use less processing power.
How to Create a Proxy


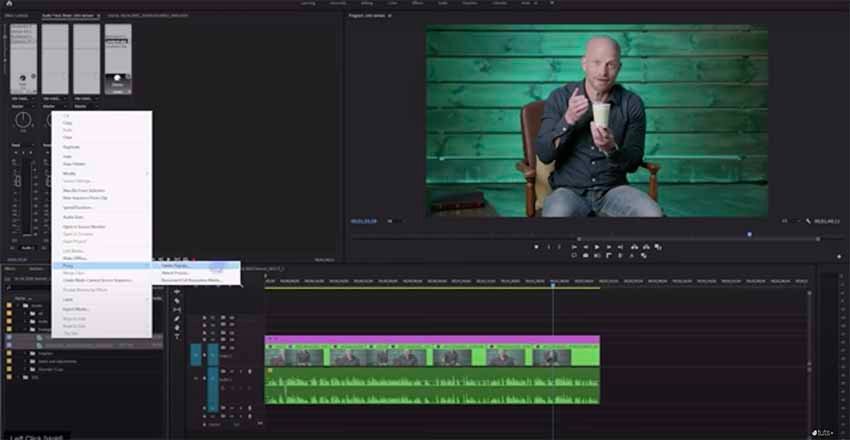
- Go to your footage in your Project panel and right-click > Proxy > Create Proxies.
- You can choose QuickTime or H.264 if your system can handle it, but avoid the stock H.264 presets, which aren’t very good. Instead, create a custom preset that is 1280 in the horizontal and then whatever the vertical resolution is relative to the original file. If you are shooting Ultra HD, that’s going to be 1280 X 720. If you’re shooting Cinema, that should be 1280 x 674.
- To create a Custom Ingest Preset, you need to open Adobe Media Encoder, where you’ll click on the + button. In the Preset Browser, choose Create Encoding Preset and name your file. Include the word “proxy” in your name so you can easily identify it.
- Usually, when you create a custom ingest preset for the first time, you will have the option to “Match Source High Bit Rate”. Do not select this option because you don’t want to create full-resolution proxies. You want to create much lower-resolution proxies.
- Uncheck Match Source and change the resolution from the default 4096 x 2160 to 1280 as the width. That’s going to make it 1280 x 674. You’ll see some compression artefacts for sure, but that’s not a big deal because you’re going for speed, not super quality.
- Under Bit Rate, you can really choose anything, but you can probably go as low as 2 or 3. When you’re done, you can click OK.
- Now, you will create an Ingest Preset. Go to the Preset Browser and click the plus button to create an Ingest Preset. Name it, and use the word “ingest” in your title so it’s easy to identify. Check that Transcode Files to Destination box because that’s going to actually create the proxies. When you’re done, click OK.
- Now, when you go to create proxies in Premiere, you click the Ingest Preset button and go to the location where the Ingest Presets are stored—this is the location where you want to go to point Premiere.
- Choose the option to put the files next to the original media in a proxy folder. As soon as you click OK, it’s going to send the files over to Adobe Media Encoder, and it’s going to begin encoding them.
Other Ways to Create Proxies
Faster Step for Creating Proxies


- Go to Windows > Media Browser and navigate to your footage in the Project panel.
- You will notice an Ingest check box at the top of the panel with a wrench icon next to it. Click that icon to choose an ingest setting that you want to use.
- You have a few options there, but follow a similar process as before: choose whichever preset you want, and choose the proxy destination—you can choose the same as the project or use the preset destination. When you’ve chosen, click OK.
- When you import the files, it’s going to pull them into the project, and if you look over in Media Encoder, it adds them to the queue. Your proxy files will be automatically linked to the source files and will be available as soon as it’s done encoding. This is a faster step if you know you’re going to create proxies with your footage.
Manual Step for Creating Proxies
- Another option in terms of the proxy workflow is to create proxies manually and then link them to your original footage after you’ve created them. If you know that you’re not going to be editing right away and your computer is going to be free overnight to create some proxies, you can just pull your files right over to the Media Encoder and choose your encoding preset for the proxies.
- When you are ready to attach your proxies, just select your files over in the Project panel and go to Proxy > Attach Proxies. When you see your file name, click to attach, and then it should point to the proxy folder. If not, you’ll have to navigate to it via your folder tree.
- If for whatever reason your full-resolution files go offline, in the same way that you attached your proxies, you can attach your full-resolution files to the proxy files. This could happen, for example, if you created proxies and you put them on a different drive or your full-resolution files are on a different drive and you need to reconnect your full-resolution files before you export.
Toggle Proxies Button
If you’ve created proxies from Premiere, it should have attached the proxies to the original files automatically. You can click the Toggle Proxies button in the toolbar to switch between the original files and the proxies. If you’re looking at your footage in full-screen view, you’ll notice a quality shift when the proxies are on and off.


If the Toggle Proxies button is not visible in the button toolbar, click the + sign in the bottom right of the program monitor and open the button editor. You can then pull the Toggle Proxies button down to your button toolbar and press OK.
You can disable the proxies at any point with the Toggle Proxies button to get back to the high-resolution footage. This is definitely something you should do before you export your files.
More Premiere Pro Resources
I hope you found this Premiere Pro tutorial useful and that you are now clearer about the proxy workflow and the basics of how to use proxies in Premiere Pro. Here are some more top Premiere Pro tutorials and resources to try from Envato Tuts+:


