Learn to colour correct like a pro with our free course DaVinci Resolve Colour Grading for Beginners. You’ll learn how to use each important tool in Resolve, including how to set up your project, how to use scene cut detection, create cinematic look, and this tutorial, which introduces noise reduction and how to use it on skin, where noise is sometimes most noticeable.
How to Use Noise Reduction to Clean Up a Video in Resolve
Let’s get started with the one of the essentials in your DaVinci Resolve post-production toolkit: noise reduction.
How to Adjust and Smooth Skin Tones in DaVinci Resolve
The next part of this lesson looks at using Resolve’s noise reduction tools to get smooth and clean skin tones.
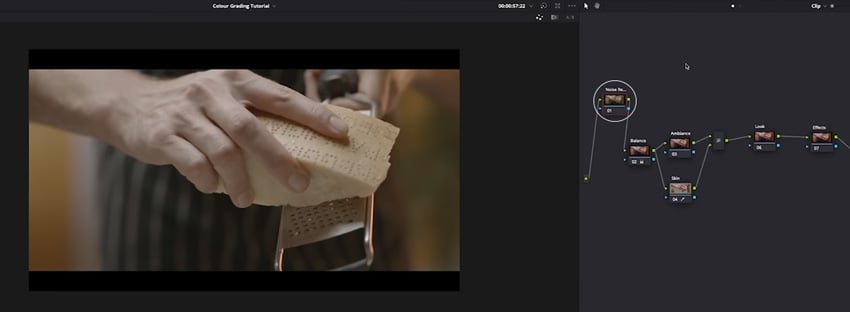
First, you’ll need to highlight your Noise Reduction node.


You may remember from a previous lesson, on setting up your nodes, that this will have the look of pre-grade because it’s on the left and everything else is happening to the right of it, and with nodes everything flows from left to right, but not back the other way.


At the bottom you can select Motion Effects (circled above) and you’ll see temporal and spatial noise reduction.


Here you can see the changes we’ve made. Changing Mo. Est. Type from Faster to Better under Temporal is a little more intensive on your system but it’ll render better. Under Spatial, if you change Faster to Better then you won’t be able to unlink Luma and Chroma. We did want to do here, so that gets left as Faster and then Chroma can be pushed up a bit.
It’s difficult to see the changes in YouTube or from screenshots because of compression, but if you head back over to your Noise Reduction node and turn that off and on, you’ll be able to see changes much more clearly.
Isolate the Skin


On the Skin node, using the pen tool (circled) cut around the skin tones, so in this case it’s the hand. Here, we want to get rid of all the orange, the cheese, and the background and so on.
Soften


To clean up the skin you can push up Soft 1 and Inside under Softness in the bottom right.
As the hand moves through the frame, we’ll also need to track this, because the changes need to move with the hand, and we’ll look at that in an upcoming lesson.
More DaVinci Resolve Colour Grading Tutorials


A Quick Guide to the Layout in DaVinci Resolve 18, for Beginners
How to Use Node-based Colour Grading in DaVinci Resolve
How to Use the Primaries Color Wheels in DaVinci Resolve
How to Use Scene Cut Detection to Import Video into DaVinci Resolve


About the Authors
Tom Graham created the video course that includes this lesson. Tom is a multi-skilled content creator with a background in commercial filmmaking.
Marie Gardiner wrote the text version of this lesson and it was edited and published by Jackson Couse.

