
You’ve just wrapped up that newest award winning photoshoot and you’re ready to process your images to get them looking their best. After copying your images you find that you’ve captured far more images than you realize, and you’re already feeling overwhelmed by the amount of editing you have on your plate. Have no fear!
In this lesson, you’ll learn batch processing techniques to help supercharge your editing workflow in Lightroom Classic and Photoshop.
Introduction to Batch Editing
Batch editing is the process that we can apply to our images to edit multiple images quickly. The basic idea behind the batch philosophy is that we can edit one image, and then edit the rest of the images in the same way using automated processes.
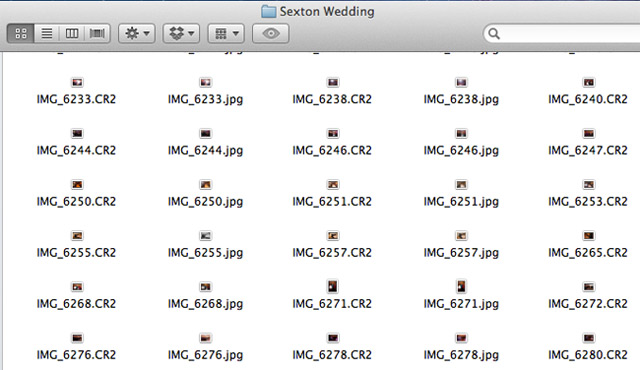
On a typical wedding shoot, I might bring home 1500 or 2000 images. That’s nothing unusual when you are out on a job all day. Whether you’re a portrait photographer that has just a few hundred images or a fellow wedding photographer, almost any photographer can benefit from batching their images.
 It can be daunting to tackle so many images from a wedding or portrait shoot in the processing phase
Batching images isn’t an approach that can apply to every single photo over the course of a shoot, unless the setup is extremely similar. Therefore, batching our editing process is an art that requires some adjustment and careful planning. Today, we’ll be looking at approaching the batch editing process in two different Adobe products: Photoshop and Lightroom.
Settings to Batch
As I mentioned earlier, it’s going to be very difficult to batch photos in their entirety. Therefore, there are certain settings that I will attempt to batch, while other settings should be adjusted on a per-image basis. Some of the settings that are good candidates for being edited on a batch level are exposure, white balance, and contrast.
Many photographers will batch images straight out of camera, especially if they shoot in RAW. Coming out of the camera, RAW images can be a little flat and require some adjustment to get them looking as good as their JPEG counterparts. RAW, however, is definitely the best format for retaining the most information.
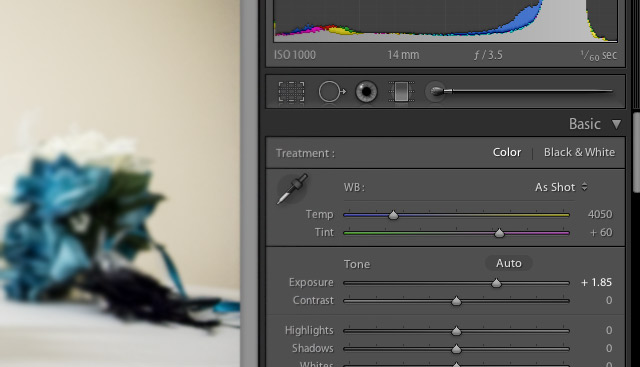 Not every setting will lend itself well to being batched across hundreds of images, but you can easily batch the Lightroom “Basics” settings such as exposure, contrast, and clarity.
Some of my photographer friends use a batch process as soon as their images are imported by bumping settings like clarity, contrast, and sharpening to get the images started. Let’s take a look at how to apply batch edits in Lightroom and Photoshop
Lightroom
When you’re tackling many images at once, Lightroom is an ideal place to do it. If you aren’t familiar with the power of using Lightroom, its true strength is in the way that it handles large amounts of images. It’s truly built to tackle whole shoots effectively.
A great method of batch processing in Lightroom is to use the “Sync Settings” feature. This option allows us to skip the work involved with creating a preset and apply settings from one photo to others. With it, we can select the editing facets we want to batch. For instance, we can apply batch tweaks like correcting exposure.
Syncing photos starts with editing one image. I like to choose an image that is similar to all the others that I’ll be syncing it to. The first step is to edit that image just the way you like it. We do this in the Develop module.
Go ahead and apply the edit as you see fit. You can actually edit the image to completion, and only sync the settings you feel will batch well, such as exposure. Once you’re finished applying your edit, you’ll then select the photos that you want to sync in terms of editing style.
With the image you just edited still selected, multi select one or more additional images. You can do this by holding shift on your keyboard and clicking another image to select all the images in between, or holding control on your keyboard (Cmd on a Mac) and then clicking each image to add it to a selection.
 To multi select images, click one image and get it selected in Lightroom. Then, hold shift and click an image somewhere down the filmstrip, and all images will be selected in between.
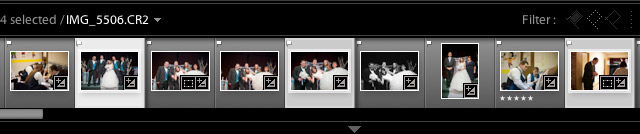 If you don’t want to sync photos that are side by side, you can multi select several images. Hold control on your keyboard (or the CMD button on a Mac) and click any other image to add it to a selection.
When you’ve selected the images you want to sync, make sure your edited image is still selected, and press the sync button that is in the lower right hand corner. You’ll then have a dialogue box pop up that allows you to choose the settings to sync. Pressing the Sync button pushes the sync through, and in a few seconds the settings will sync across your selected images.
You’ll find that syncing your settings while batching is not going to get all of your images edited perfectly. Still, it’s a great time saver that serves as a wonderful starting point for getting your images edited. Tweak them on an individual level to your liking, and count the time savings easily.
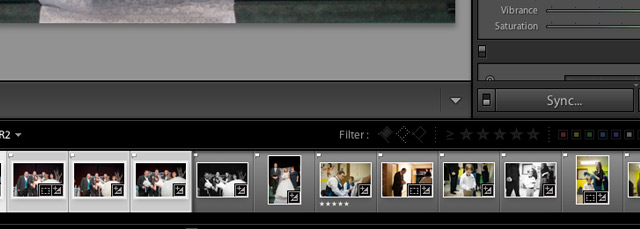 After multi selecting images, the button below the editing settings on the right side of Lightroom will say “Sync.” Press it to get started with syncing settings.
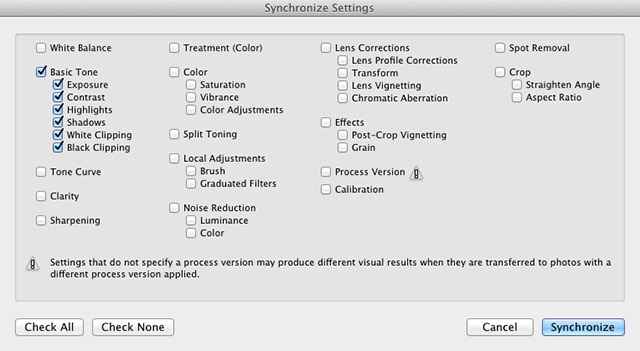 Typically, we sync settings selectively – I usually will sync basic settings such as exposure across a series of photos in order to get the images similarly exposed.
On a practical level, I approach batching in stages. When I shoot weddings, I often find that lighting situations are similar for large blocks of time. I can batch many of the dance photos together because the lighting is similar enough. Similarly, I can usually batch family photos that are taken under consistent lighting.
The trick batching your photos is keeping your settings consistent when you’re shooting. When you want efficiency, it’s better to have 40 photos that are all over by half a stop than 40 photos with 40 different exposure. Practically speaking, this means walking into a scene getting your setting as close to perfect as possible, and then not touching them again until you change scenes.
Easy enough, right? Multi-select photos, then sync the settings you want to batch. With a bit of tweaking, the editing process becomes quite manageable.
The trick batching your photos is keeping your settings consistent when you’re shooting.
Photoshop
Another option for batch editing images is to use Photoshop. If you still prefer the high level of detail and control that Adobe’s creative juggernaut holds, there are batch methods for Photoshop that work great. Today, we’ll batch apply an action through Bridge.
The first step is to create an action in Photoshop. An action is a routine of steps to apply. To create an action go ahead and start off by opening an image in Photoshop, and then opening the Actions panel. If you don’t already have it open, go to Window > Actions, and you’ll see it appear. You’ll need to create a new action and let the recording start.
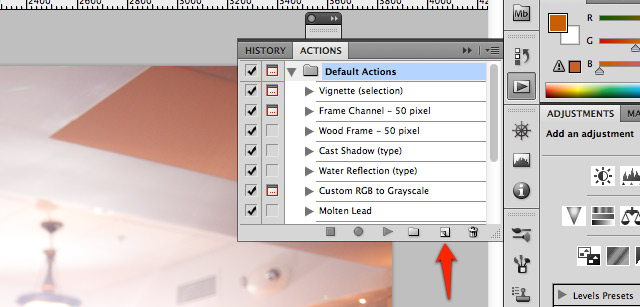 First, ensure that you open the actions panel using the Window menu. Next, create a new action by pressing the button to the left of the trash bin.
 Make sure and give your action a name and press “Record” to start building a new action.
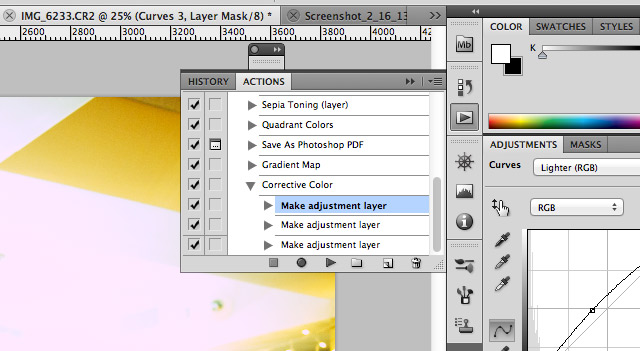
Once you’ve given your action a name, Photoshop will begin recording your steps. With each adjustment you apply to the image, it will add steps to the preset. You can do anything you want, but for most purposes, you’ll want treat this like Lightroom. Keep your adjustments general so they easily apply well to other photos. You can even batch captions and other file info.
You need to hit “Stop” button when you’re done.
Next, we’ll use Adobe Bridge to apply the action to a multitude of images. Bridge is installed alongside Photoshop and is a great way to manage and organize your photos visually. Make sure you leave Photoshop running, as we will be back to using it momentarily.
Keep your adjustments general so they easily apply well to other photos. You can even batch captions and other file info.
Apply to Action to a Batch in Bridge
Open Bridge and browse to your images. You’ll want to multi select the images you wish to batch, and can click and drag to do so. After selecting the batch of images, you’ll want to go to the Tools > Photoshop menu, and select Batch.
You’ll be switched back to Photoshop, where you will see the window to apply settings to a batch. Remember the action that we created earlier? Select it from the dropdown list and choose OK and it will apply that action to your images.
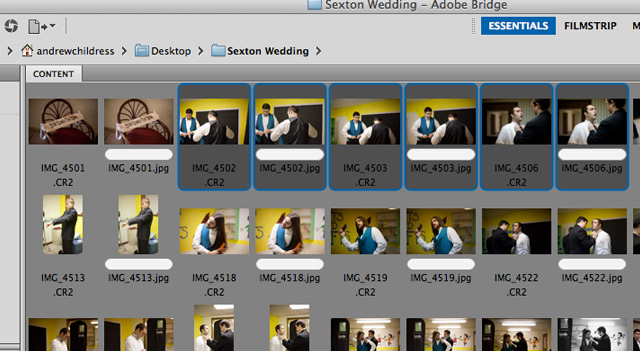 You can multi select the images to batch in Bridge by dragging a box around them.
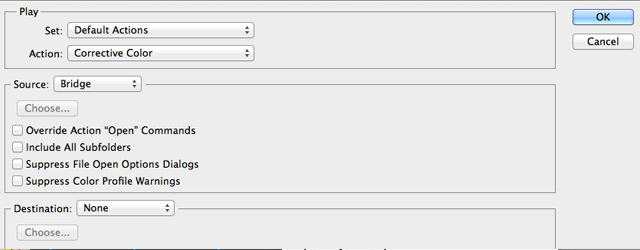 Start the batching process by choosing the action that we created earlier and clicking OK. One by one, Photoshop will open your images and apply the action we created.
With a few steps, you can first create an action, and then have it applied to a batch of photos utilizing the combination of Bridge and Photoshop. With the right approach to the technical side of the process, you can save yourself many hours of tedious editing.
Whether you’re working with Photoshop or Lightroom, you can batch photos to optimize your workflow and get images out the door quickly. You don’t have to sacrifice the quality of your edits. Let the batch process take care of the easy parts of editing, and then fine tune images individually to perfection.
With the right approach to the technical side of the process, you can save yourself many hours of tedious editing.
Start Saving Time Now
When it comes to editing, many photographers are overwhelmed by the time commitment of editing the hundreds or even thousands of images that are produced on shoots. With some of the batch processing techniques we have now covered, you can make the digital workflow a much more manageable task.
Are you a batch editor? How are you using batch techniques to improve your workflow?

