Filmulator is an open-source raw photo editor based around the filming developing process, with a library management feature to help you organise your photographs. It’s free and available for both Windows and Linux users. Here, we’ll take a look at its main features and walk you through how to edit your images.
How to Process Raw Photos With Filmulator
When you install and run Filmulator, you’ll see it’s a fairly simple interface with four main tabs across the top. Let’s take a quick look at them first, before we get into the editing.
Import
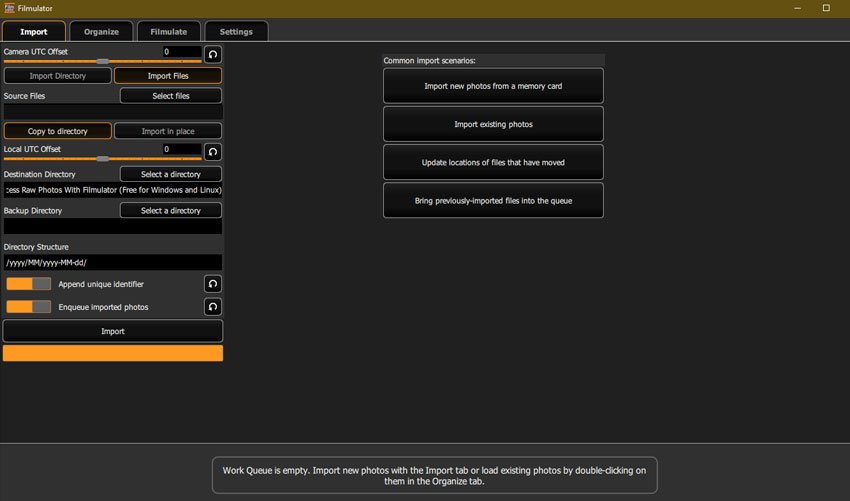
The Import tab is where you add images. Unfortunately, there’s no drag and drop option, so you have to either Copy to Directory, which will make a copy of your photograph in a new folder and location, or Import in Place, which will open the photo from whichever folder, drive, or card you have it saved on.


You have options to batch upload images and add them to a work queue, and you can sort your directory (if that’s the option you choose) by date in whichever format you prefer. There’s also a unique identifier you can add if you’re batch editing.
Organize
The Organize tab is simple but effective. Your photos are broken up according to the date you took them, represented by little bars like a graph at the top to show you how many photos you took on each date.


From here, you can do a couple of things. Choose to add images to a queue to edit with a double-click, or click once on a photo to select it, and then change the rating. If you add a photo to the queue, it’ll appear in the strip at the bottom, and you can then access further options with a right-click, although they’re mostly just a quick-access duplicate of the options you already have.
If you change the settings on a photograph, you’ll notice the background will change from grey to green.
Settings
I’ll skip over Filmulate for now and go through editing in more detail after covering what’s in Settings.


These are mostly preferences like keeping the memory usage low while working on larger images, making sure the software and databases are up to date, and choosing what size you’d like to preview your finished image at.
One thing to pay attention to here is the Smooth Editor Image option, which will mipmap the editor view when you’re zoomed in to 1:1 or greater. If this is off, you might see more artifacts or aliasing, but turning it on affects the sharpness of what you’re seeing. Filmulator recommends leaving it off, particularly for low-resolution screens.
How to Use Filmulate to Post-Process Photographs
Alright, let’s get into working with photos.


You might be used to flipping around the sliders when you edit your raw photographs, but Filmulator is designed a little differently. You’re supposed to edit by adjusting the sliders in order, the idea being that each stage feeds the next, and this optimises the data and your edits.
Choose a Lens Profile
As with other raw editors, you can select your lens from a list to help correct things like vignette or distortion.


Even though Filmulator recognised my lens, I couldn’t actually get it to select it no matter what I tried, so there was no profile correction for me. This isn’t a deal-breaker, but it’s not ideal given that I usually find the lens profile corrections quite useful, particularly for wide lenses where you do get some noticeable barrelling.


There are some other controls at the top that are pretty self-explanatory: things like a crop tool, a levelling tool, rotate, and so on.
Pre-Filmulation (Top-Third of the Panel)
First, if we look at the upper section of the main panel on the right, at the very top is a histogram which illustrates in a simplified graph all of the data in your image. That’s your raw histogram, and any changes you make to the sliders underneath will be reflected in the image and the histogram. Each slider will take a little time to ‘run’, and you can see that in the orange bar at the top left of the Filmulate software.


Auto CA Correction is for chromatic aberration. Each notch you increase it runs the algorithm, so if your image has CA, just notch it up 1 slot at a time and wait for it to run until you move it up again.
Highlight Recovery will only work if you’ve actually clipped your highlights—it isn’t really for just darkening light areas. One notch up will simply recover any clipped highlights. Two notches will work on up to two clipped channels, attempting to reconstruct any colours.
Temperature and Tint are, as you’ll have seen them in other programs, to adjust your white balance by adding warmth or coolness to your image and to add a purple or green tint.
Exposure Compensation lightens or darkens your whole image.
Development (Middle-Third of the Panel)
Filmulator wants us to think of the previous steps as ‘exposing’ your image (as if it were film), and this next section is therefore ‘development’.


The first options are Shadow Rolloff Point and Highlight Rolloff Point. In film terms, this is essentially the way your shadows blend into your highlights or vice versa. If you imagine it like a gradient, it shouldn’t really be noticeable—it would be very gradual.


If I drag the Shadow Rolloff slider all the way up, you can clearly see in the sky where darker tones meet highlights.
Where digital cameras clip very bright information in a photo, film would in theory handle over- or under-exposure better, creating a smoother gradient.
Film Area, according to Filmulator, “controls the scale of the diffusion”, which I assume refers to the light in the image. It didn’t seem to have much effect other than perhaps a slight increase in brightness in the middle of the photo.


Drama and Overdrive (an on/off button rather than a slider) are supposed to reflect film photography ‘replenishment’, where fresh chemistry is used to replace exhausted chemistry. In digital image terms, this seems to give it a slight HDR effect.
Post-Filmulation (Bottom-Third of the Panel)


The Black Clipping Point and White Clipping Point options are straightforward: lower the white point and the whole image becomes lighter, raise it and it gets darker, and so on. You’re essentially using these options to create a tonal foundation for the whole image.
Shadow Brightness and Highlight Brightness are for adjusting bright and dark areas that aren’t at the edge of your range. In fact, while the highlights slider only adjusts the highlights, the shadows one will actually affect your midtones too.
You’ll notice that next is another on/off Monochrome button. With Monochrome set to off, your next two options are Vibrance and Saturation. Vibrance works with colours in the mid-range, whereas Saturation affects the colours in the whole image.
If you turn Monochrome on, you’ll see that the Vibrance and Saturation options change to Red Weight, Green Weight, and Blue Weight. Using these, you can adjust the tones in your photograph.
Finished Results
When you’ve finished editing, you can click Save as Tiff or Save as JPEG. Annoyingly, this closes the software, and although it’s supposed to save the finished photograph in your chosen directory, it didn’t and wouldn’t no matter how I tried. I’m assuming this is either a bug specific to my machine and settings or one they’ll work out in a future release, but in the meantime, I’ve taken a screenshot to show you the results.
Before
This is the photo as it looks, raw, so with a rather flat profile and exposed for the sky.


After Filmulator – Colour
The image has more saturation and contrast but perhaps a slight edge of faux-HDR.


After: Black & White
For me, the black and white results are better, particularly if you want something with high contrast and drama.


In Conclusion
Filmulator claims to replicate a film photography process, and in some ways I can see the appeal, especially when you compare it to other raw editors. Firstly, it breaks the processes down into a particular order, just as you would with film, rather than flipping about in a digital editor making tweaks here and there.
Realistically, I think you have to take that at face value, because at the end of the day you’re still working with digital photographs, and the editor can only work with the information that the image contains. As someone who uses Adobe Camera Raw to edit my images, I found Filmulator a bit limiting and frustrating. That said, I can see why sometimes scaling something down can make it more effective, and I think that beginners, film-photography enthusiasts, and people who want to make quick batch edits to photographs would get the most benefit out of this software. Its organisation options also make it appealing if you’re dealing with a lot of images frequently.
Filmulator is free and open-source, and projects like this should be encouraged. A lot of time and effort is put into creating software and making it available, and I’m sure as time goes on that it’ll get more efficient and have some of the bugs worked out. As it stands, give it a go—it’s fun to play around with once you get the hang of what the various options do, and you can get some nice results, particularly in black and white.
More Video Resources From Envato
Read the Envato Video Marketing Guide
Boost your video marketing skills with our comprehensive guide: You’ll learn video marketing from start to finish.
Download Free Video, Free Music, and Free Motion Graphics Templates From Mixkit
Check out Mixkit for free stock videos, free stock music, and free templates for Adobe Premiere Pro. Yes, free!
Make a Motion Graphics Video Online With Placeit
You don’t need professional software to create visually appealing videos—you can make them right in your browser: Placeit is an online service with a video maker that uses professionally designed motion graphics templates.
Envato Elements: Unlimited Downloads
Envato Elements offers millions of stock items: photos, music, video clips, fonts, graphics templates of all sorts, video project templates for After Effects, Premiere Pro, Final Cut Pro and Motion, and creative courses from Envato Tuts+, all with a single subscription.
More Resources for Raw Photos


