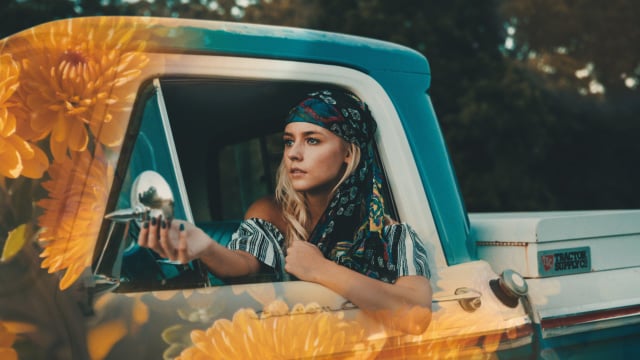
In this tutorial, you’ll learn how you can make a double exposure video in Adobe After Effects.
The goal of this tutorial is to show how you could create a compelling short commercial or client video using only still images and a limited budget. The final results will have a look similar to the popular True Detective titles sequence.
For example, let’s say you have a client project, but your client doesn’t have the resources or the money for a proper production with camera, gear, assistants, lighting, and so on. Instead, you could purchase a few After Effects templates from Videohive to use with existing client photos, stock images, or creative commons photos available online.
1. The Basic Effect: Double Exposure Kit for After Effects
The After Effects template you will need to get started on your double exposure video is the Double Exposure Kit from Videohive. This template is easy to use and allows you to create as many double exposure animation sequences as you want. You can use the template with images or video clips.
In After Effects, you use the Pen Tool to quickly “cut out” and isolate your subject for the double exposure. The template allows you to also add in subtle depth and movement with parallax effects. This is quite an effective technique and looks similar to ultra slow-motion video.


2. Add Another Layer of Interest : Watercolor Motion Kit
It is also possible to combine other After Effects templates with the Double Exposure Kit. One that works quite well is the Watercolor Motion Kit, which give us an ink-drop reveal on the bottom image layer. This animation combined with the double exposure really helps increase the production value of the sequence. It is also a must if you are wanting to create a ‘grungy’ or vintage vibe on your video.


3. One More Thing: Add Alpha Channel Elements
I always enjoy adding in alpha channel video elements whenever I can. For one, they are a an easy way of making a shot more dynamic and cinematic.
In the case of our double exposure video, elements like smoke and dust contrast well off the subtle movement of the images. This also helps sell to the viewer that they are watching a video and not just two static images. Other common alpha channel elements you might consider would be fire, ink drops, film grain or even elements like birds or other animals.


4. Complete the Video
Finally, to top things off you could overlay some music or add in voice over narration to go along with the images. Hopefully this quick overview of double exposure video helped spark some ideas for your next project. You can find links for all of the After Effects templates and footage mentioned in the tutorial below, and some of my favorites to use as well. If you would like to know more about creating double exposures, check out How to Create Double Exposure Images with 3D Models.


Here’s a real-world example that uses all of the techniques: double-exposure, an animated reveal (in this case, I think it’s an ink type animation, not watercolor, but pretty similar), and alpha channel footage. This video is a 2017 season trailer for the Shaw Fest, a theater festival in Niagara, Ontario. In an extra nice touch, they also carried the double-exposure images over to the poster designs for their plays.
Mentioned in this tutorial
- Double Exposure Kit from VideoHive
- Watercolor Motion Kit from VideoHive
- True Detective Title Sequence
- Shaw Festival Double Exposure Advertisement
- Alpha Channel Smoke
- Alpha Channel Dust
- Alpha Channel Birds
- Ink Drops
- How to Create Double Exposure Images with 3D Models
- How to Accent Drone Video with Alpha Channel Stock Footage


