In this lesson from David Bode’s Free Ultimate Premiere Pro FAQ Course, you will learn how to export your projects to an intermediate codec like ProRes, CineForm, or DNX.
What Is an Intermediate Codec?
An intermediate codec is something you use in the post-production process. It’s not something you’d typically use to deliver a final product to an end destination, but instead it’s used to send an edited version of your project over to someone else to have it colour corrected, to have motion graphics applied, to be part of a longer video, etc.
When you’re working with other editors on a project, you don’t want to give them a highly compressed delivery codec because they are going to take that whole edit and then compress it again. Intermediate codecs have less visual loss to them than your typical delivery codec. They have way more colour information and way more bit depth, which is shades of grey in each one of the colour channels.
3 Most Popular Intermediate Codecs
There are three main intermediate codecs that are industry standard:
- Apple ProRes
- GoPro’s CineForm
- Avid’s DNX
Export Your Project Using an Intermediate Codec
Exporting your projects to an intermediate codec is the same as exporting a delivery codec—you just need to change the format.


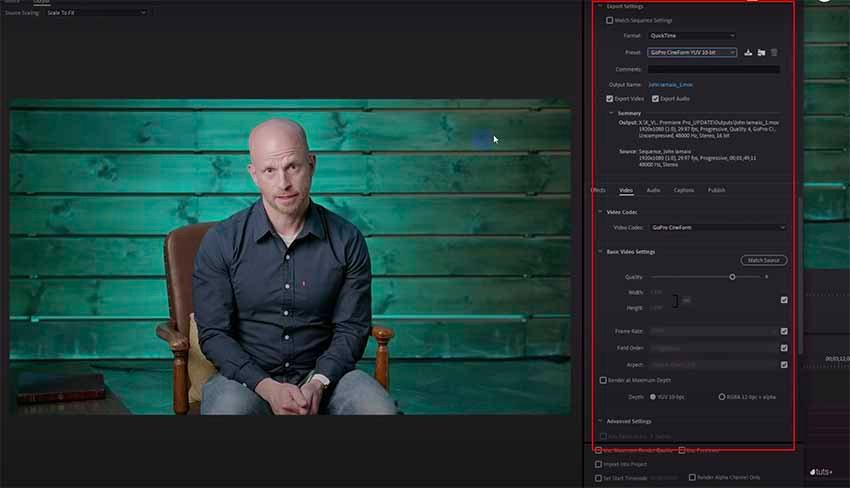
- Hit Control-M on the keyboard to bring up the Export Settings window. Instead of H.264 or H.265, select the QuickTime format. QuickTime is not a codec; it’s more of a bucket, and inside that bucket you can use many different codecs.
- For Preset, select Apple ProRes 422, normally called just ProRes, or Go Pro CineForm YUV 10 bit. If you’re ever exporting graphics from After Effects and they have a transparent background, you’re going to need a codec with an alpha channel. In that case, pick Apple ProRes 4444 with Alpha, or maybe go for Pro CineForm 12 bit with Alpha.
- If you use CineForm, you can set the quality via a quality slider in the Basic Video Settings. The preset for YUV 10 bit is on 4, and it only goes up to 5. Both 4 and 5 are nearly visually lossless, so they’re both very high quality. If you use a preset for ProRes, you don’t even get an option for the bandwidth because the bandwidth is in the ProRes preset.
- When you’re done, just Export as usual.
More Premiere Pro Resources
So now you know how to export Apple ProRes in Premiere Pro. Here are more top Premiere Pro tutorials and resources to try from Envato Tuts+:


