Comfort with the ‘Basic‘ panel in Lightroom Classic is the bedrock of a great photo edit. Lightroom Classic’s user-friendly interface allows you to play around with adjustment sliders, and letting your eyes guide you is a great way to get started on your editing journey. However, getting to understand what the adjustments are really doing lets you get the most out of your editing.
In this tutorial, we’re going to dive in and take a closer look at the Highlights adjustment in Lightroom Classic and how it affects your photos.
What’s the Difference Between the ‘Highlights’ and ‘Whites’ Adjustments?
These two adjustments can easily be confused. The major difference between them is how the tonal ranges of an image are affected.
- Move Highlights Slider to the Left (negative values) to bring back detail in the brightest areas.
- Move Highlights Slider to the Right (positive values) to brighten the brightest areas while protecting against clipping (“blowing out”) the highlight details.
- Whites – sets the white point, or defines what is maximum brightness of ‘white’ allowed in the image. Negative values decrease the tonal range by reducing the white point, and positive values increase the tonal range by raising the white point.
If you’re a tad confused at this point, fear not, let’s jump in to an edit, and see how this all pans out on a real image. Spoiler Alert! The Histogram is going to be our best friend.


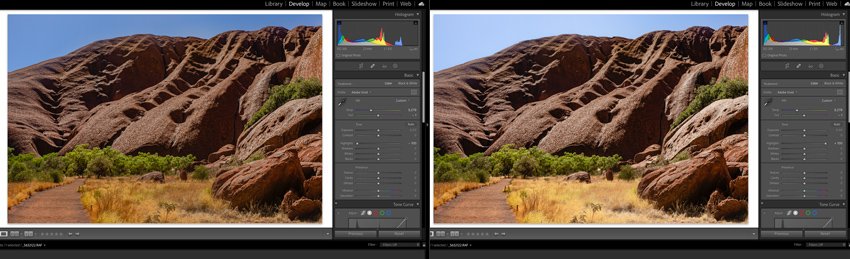
Some pretty interesting results here! At first glance, the -100 Highlights and -100 Whites adjustments look almost identical, while the +100 Highlights and +100 Whites adjustments look very different from one another.
The best way to understand what’s going on here is to hone in on the Histogram.


Notice how the entire tonality range of the +100 Highlights adjustment (left) is contained within the Histogram, in contrast to the clipping of the whites on the +100 Whites adjustment (right). While this example is a bit extreme with the sliders at 100’s, this illustrates how the two sliders differ, and how you can these tools to your advantage.
I hope this has helped you differentiate between the Highlight and Whites adjustments in Lightroom Classic, and you’ll be able to make a more effective decision for which tool is most appropriate in your next photo edit.


 PhotographyThe A-Z of Adobe Lightroom Classic for Photography
- PhotographyHow to Use Curves to Change Contrast and Tone in Photos With Lightroom Classic
- Adobe LightroomHow to Adjust Contrast in Photos With Highlight and Shadow Controls in Lightroom
- PhotographyHow to Adjust the Shadows in Photos Using Lightroom Classic


